Unlock Document Parsing with Cradl AI in Blue Prism
This guide will show you how to extract data from your documents with Cradl AI in Blue Prism. By the end of this guide you should be able to:
- Train your own AI model customized to your own documents.
- Set up a feedback loop so your AI model can train and get better for every document you process.
- Process your documents in your Blue Prism workflow using Cradl AI.
All you need to get started is:
- Blue Prism is installed on your computer.
- Account on Cradl AI (If you don't have one yet, you can sign up here).
- The Cradl AI Blue Prism Release.
Cradl AI empowers you with the ability to create your own AI models. 15 examples are all you need to get started.
Overview
The Cradl AI Blue Prism asset consists of these components:
| Name | Type | Description |
|---|---|---|
| Cradl AI | Visual Business Object (VBO) | This is where all the actions for this guide can be found. |
| Cradl Demo Process | Process | A demo process that shows an example of how you can retrieve the parsed documents from your Flow in Cradl AI. |
| Cradl AI Web API | Web Api Service | The API itself. It is possible to make adjustments here for advanced cases that require customization, to get the most out of Cradl AI. |
| Cradl File Server | Web Api Service | To support all sorts of documents of different sizes, Cradl AI comes with a file server that is used behind the scenes. It is not recommended to make any changes in this component. |
| Cradl Credentials | OAuth 2.0 - Client Credentials | Make sure to add your own Client ID and Client Secret from Cradl Flow Builder in this object for everything to play along nicely. |
Step 1: Login to Cradl and setup a Flow
There is very little setup required in Cradl before you are ready to add actions in your Blue Prism processes. All you have to do is:
- Open the Flow Builder and press create new.
- Select a pre-trained model to get started. You are also free to customize the model to extract the fields you want.
- Add your co-workers as human validators to get help with the initial validation process.
- Give your flow a suitable name and press save.
You are now ready to jump into Blue Prism and start the integration. But on your way there, remember to bring the parameters listed under Blue Prism in the input and/or export dropdown. They are essential to identify you, your model and your flow. Here is a brief explanation of what they are and how they are used:
| Parameter | Type | Description |
|---|---|---|
| Client ID | Credentials | The identity of your Blue Prism integration. Input this along with Client Secret when prompted with credentials. |
| Client Secret | Credentials | The secret key to authenticate your client. Do not share this with anyone, but store it safely when prompted with credentials during import. |
| flowId | Data Object | The identity of the very flow you just created. It is used as an input to some of the actions in the VBO. |
| modelId | Data Object | The identity of the model you are using in this flow. It is used as an input to some of the actions in the VBO. |
You can at any point change the model in your flow by selecting another modelId.
Step 2: Import Cradl AI in Blue Prism
- Download the Cradl AI Blue Prism Release if you have not already done so.
- Open Blue Prism and import the .bprelease file from the link above.
- When prompted with credentials, input the Client ID and Client Secret listed in the input or export step in your flow builder.
Step 3: Send in a document to your flow in Cradl AI and complete a step of the feedback loop
- To test that everything works, open the Cradl AI VBO and do a debug run of the action Parse Document With Human In The Loop. Remember to set the flowId to the correct value.
- Head over to Cradl. You can now go to the Validator by pressing the button Run In Validator. This is the Human-in-the-loop platform that comes with Cradl AI, and you should see your document appear in your flow.
- To get your own customized model you need to provide some ground truth data, so the AI knows what to look for. This is done by heading down to Tasks.
- Fill in the correct values and press the big green button. You have now completed one iteration of the feedback loop.
The values that you annotated are used as ground truth when training the model, so you are one document closer to having your own customized model!
You need to have at least 15 documents annotated this way before training a model.
So just to sum up, we have now done the following:
- Sent in a document for parsing to Cradl AI
- Created a feedback loop and done one iteration of it.
Until now this seems like just another manual step in your workflow, where is the automation?
The automation starts after 15 documents have passed through the manual step, then you can train your model.
When the training has completed, adjust the confidence thresholds in your flow so correctly predicted values from the model pass straight through the validation.
This brings us to the next section, how do we get the predictions from the model back into Blue Prism?
Step 4: Get the parsed document back into Blue Prism
- Open the process "Cradl Demo Process", it should look something like this:
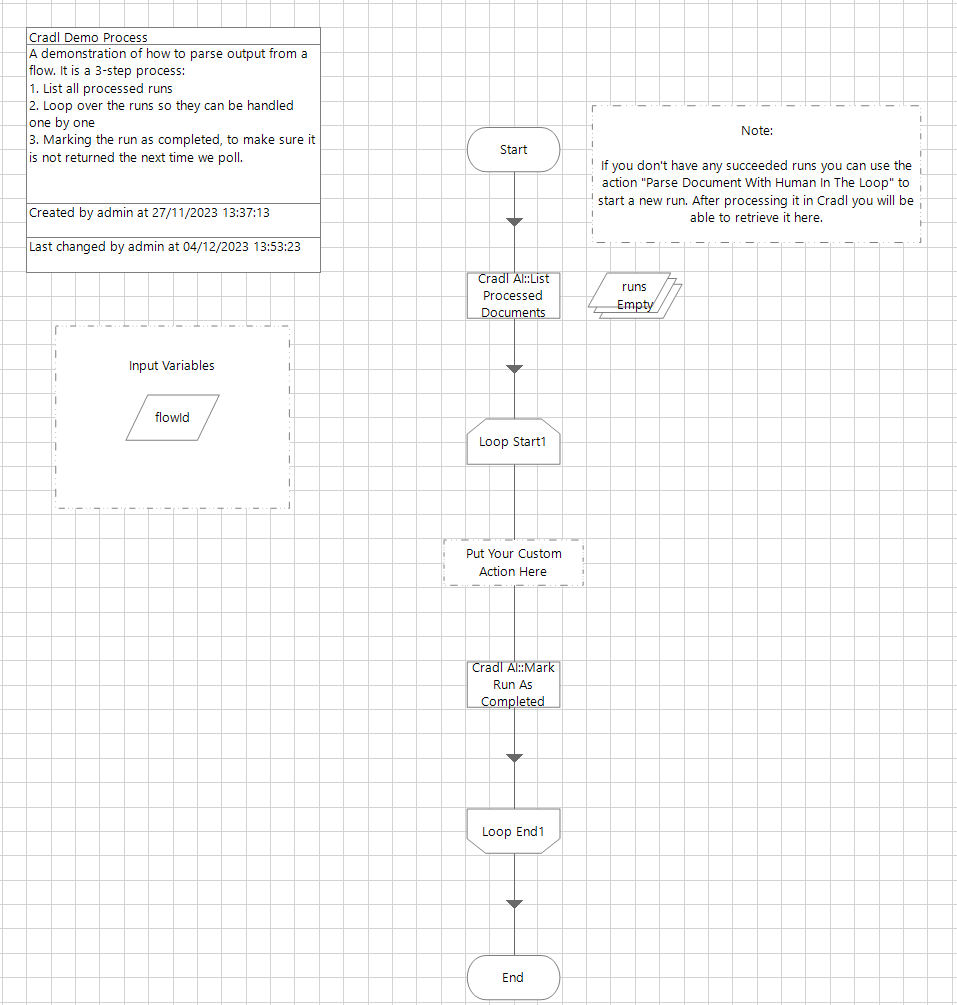
- Make sure to set the flowId to the correct value as found in Cradl. Then do a debug run.
- The data object called "runs" should now have a value. If not, make sure that you have processed a document in Cradl. We are only listing completed runs here, so all runs that are waiting in line to be manually parsed will not show up here. Open runs and get familiar with the output of each run.
- The demo process will loop through all the completed runs and mark them as consumed, so you don't risk sending them further down your pipeline several times.
The validated data from the processed documents are stored in runs.output.values, and can be extracted for each document in the loop.
Exactly how to extract the data depends on whether or not the field is a line items field or
a regular key-value field.
Extracting a key-value field
If the data you want to extract is a key-value field, like total_amount, do the following:
- Add a Calculation to your process.
- In Expression, put
[runs.output.values.<YOUR FIELD>], where<YOUR FIELD>is exchanged with the field you want to extract (liketotal_amount). - Remember to also add a Data object to store the value in.
- Process a new document in Cradl (Step 3), run the "Cradl Demo Process" again and see that something has been stored in your newly created Data object.

Extracting line items fields
If the data you want to extract is a line items field, the process is slightly more complicated. You will first need to store all line items fields in a Collection, then, loop through the collection, and store the line items field you want in a separate Collection.
- Inside the loop iterating runs, add a Calculation that stores all the line items field in a Collection.
If your field is called
line_items, the expression in the calculation should be[runs.output.values.line_items]. - Add a loop that iterates through the newly created line items collection.
- Create another Collection for storing the specific line items field, and add the field to the Fields of the collection. If you
for instance want to extract the field
line_items/description, you could adddescriptionto Fields.

- Add an Action from the built-in Collection object that adds a new row to the collection created in 3.
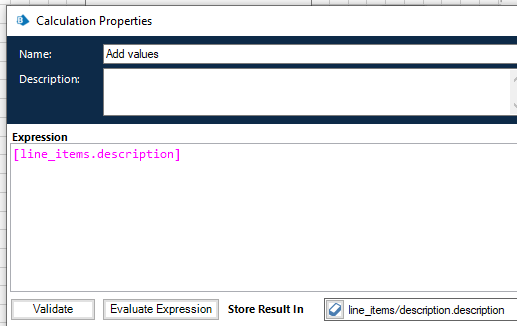
- Add a Calculation that stores the line items field in the newly created row in the Field in the collection.
- You might also want to delete all rows in the collection before you start processing a new document, so you do not continue adding rows to the collection.
All in all, extracting key-value fields and line items fields will look something like this:
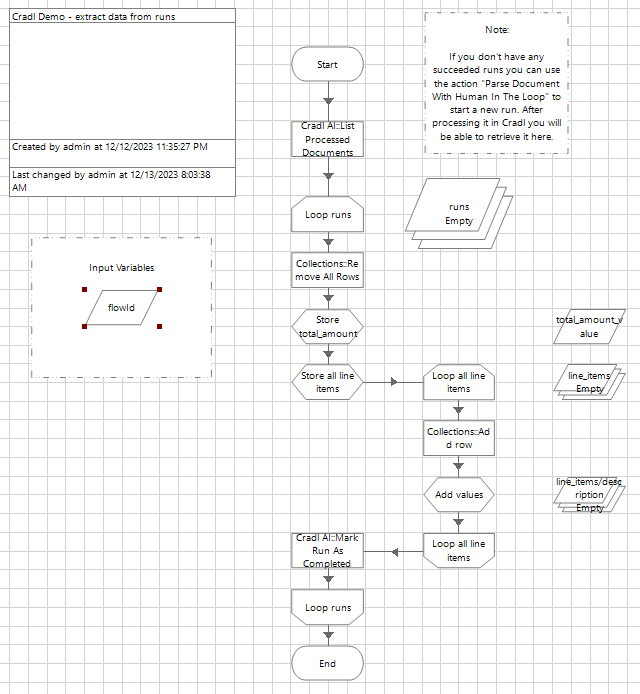
If you want to test this out, or just take a closer look, you can download this process here. Remember to first install the Cradl AI Blue Prism release.
The rest is up to you, you can write the data from each run to your database, send it to another API, or just safely store it in a local file. Happy document parsing!